Estimated time to read: 5 minutes
If you buy your groceries online such as through Walmart’s app or website and have them delivered, you know that it's just so convenient.
Still, the offline experience has a lot of advantages of discovery: walking through every aisle and being inspired by the items you might come across. You'll walk into the store needing three things, but deliberately slow down to browse all the aisles and check out with 20 items and a couple recipe ideas for the week. (This week, it was homemade ravioli, if you’re interested.) That’s a grocery store’s best upselling strategy: organizing the aisles in a way that facilitates long periods of just browsing.
Here’s where this gets relevant to our industry, though. Walmart’s app and website do the same thing! Take a look:

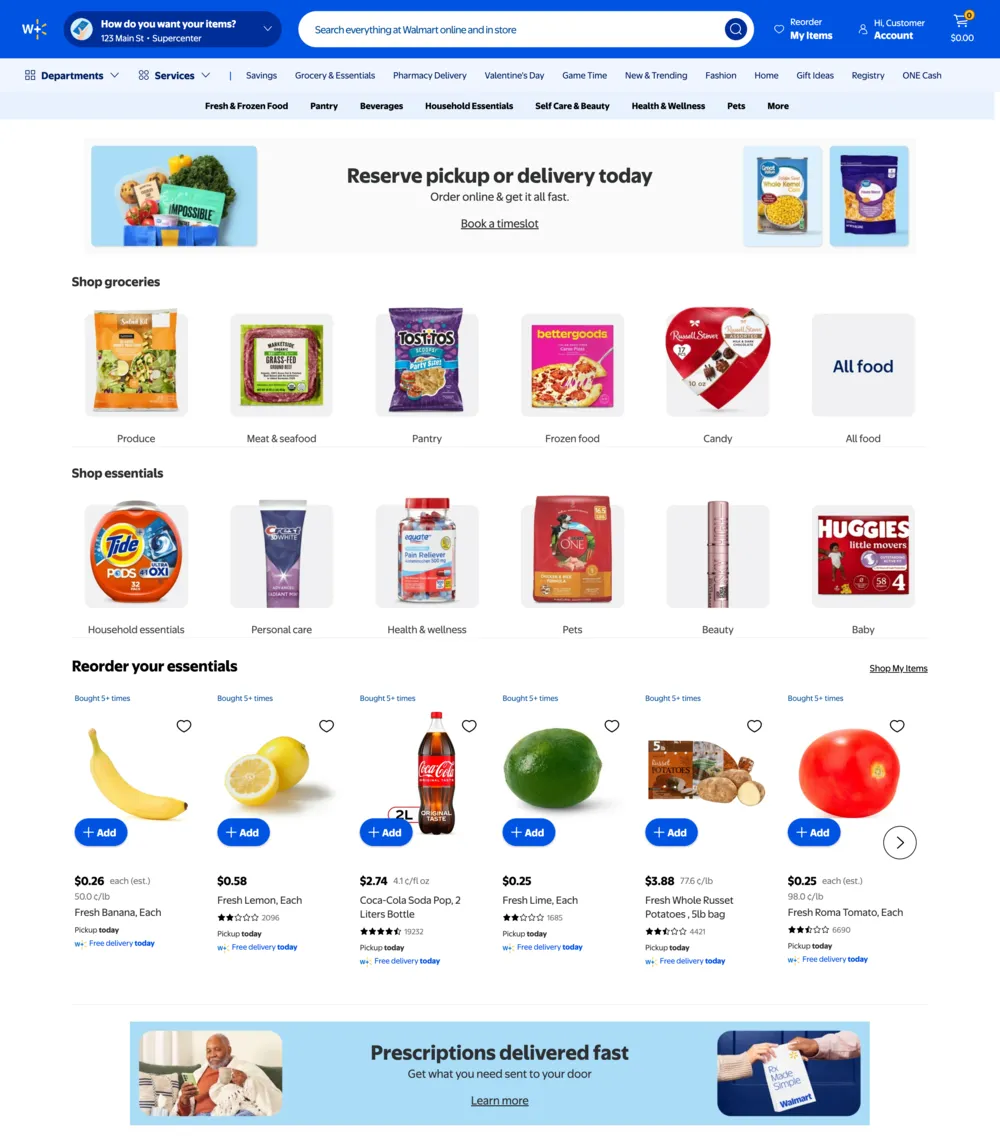
They also have a hierarchy of category pages that items can belong to, each with their own CTAs. On this main landing page, they can recommend certain categories I might like, plus individual products that might suit me and ads for various services they offer.
Whether you're Walmart or another ecommerce store, you want your category (or product listing pages, as they're sometimes called) to convert, grow average order size, and keep customers coming back for more. Sound hard? Well, I’ve got a little secret for you. While this might be what I regard as the most useful feature on Walmart’s website for both the consumer and the seller, it doesn’t actually take a team of developers months to implement like you’d imagine. In fact, I’m going to show you how to do this in just a few minutes. If you’d like to follow along, here’s the GitHub repo with the complete code.
Our empty components
The first step is creating components for the different pieces on our page. If we’re creating something similar to Walmart’s, we’ll need these components:
Product banners. Walmart is trying to incentivize people to sign up for their premium subscription, so some of the banner ads directly advertise for it. Other ads, however, promote features that are improved somehow for Walmart Plus members (like how delivery is free for subscribers but not for other customers) so that the benefits of the subscription can be more clearly demonstrated somewhere else in the checkout process. If you want to follow this same model, you’ll need to design a few of these in advance and place them somewhere in this otherwise personalized page. Here’s the component for a fixed ad that we can use from our main page layout:
// components/Ad.js

import './Ad.css';

const Ad = ({image1, image2, title, description, linkText, linkURL}) => { return ( <aside className="ad"> <img src={image1}/> <div> <h2>{title}</h2> <p>{description}</p> <a href={linkURL}>{linkText}</a> </div> <img src={image2}/> </aside> ); };

export default Ad;
How it works: This component takes in information about the ad (like image, text, and CTA data) and compiles it into a prewritten layout. With CSS, it looks like this:

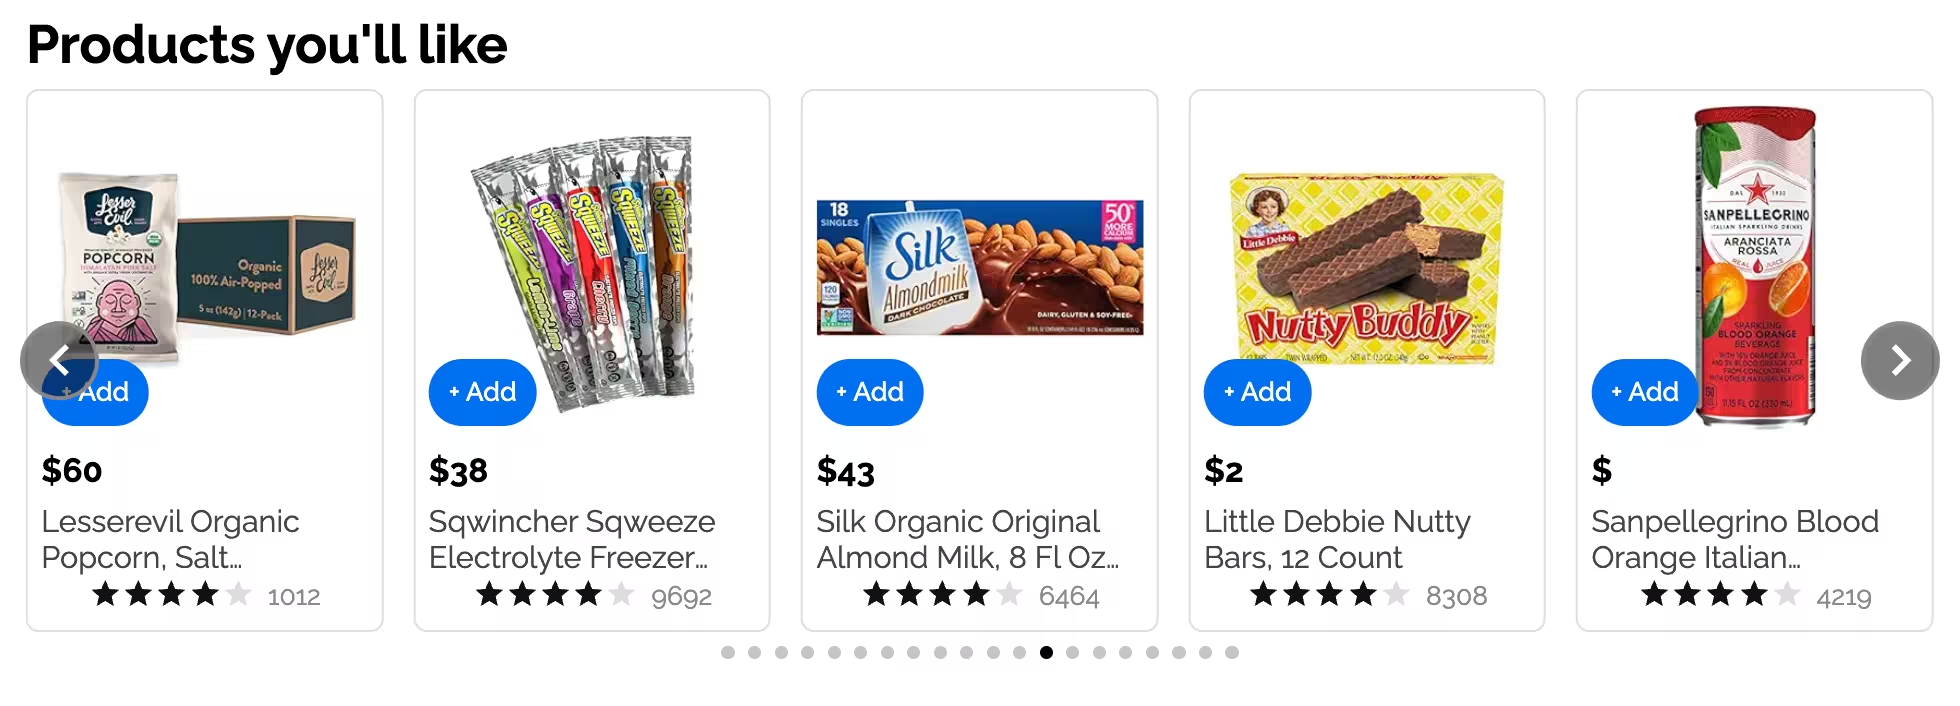
Product carousels. This one is needed to display the products we recommend. I was not even remotely interested in coding the UI logic myself, so I just used this helpful library called Keen Slider. I also built a ProductCard component for each individual product, though since it doesn’t contain anything super interesting, I’ll just show you in the GitHub repo.
// components/ProductGrid.js

"use client";

import React, { useState } from "react";
import ProductCard from './ProductCard';
import './ProductGrid.css';
import 'keen-slider/keen-slider.min.css';
import { useKeenSlider } from 'keen-slider/react';

const ProductGrid = ({ title, products }) => {
  const [currentSlide, setCurrentSlide] = useState(0)
  const [loaded, setLoaded] = useState(false)
  const [sliderRef, instanceRef] = useKeenSlider({
    initial: 0,
    slideChanged(slider) {
      setCurrentSlide(slider.track.details.rel)
    },
    created() {
      setLoaded(true)
    },
    slides: {
      perView: () => {
        const slideCount = Math.floor(window.innerWidth / 200);
        document.body.style.setProperty("--slide-count", slideCount);
        return slideCount;
      },
      spacing: 15
    },
    loop: true,
    selector: ".product-card"
  });

  return (
    <>
      <h2 className="product-grid-title">{title}</h2>
      <div className="product-grid-wrapper">
        <div className="navigation-wrapper">
          <div ref={sliderRef} className="keen-slider">
            {products.map(product => <ProductCard key={product.objectID} product={product} />)}
          </div>
          {loaded && instanceRef.current && (
            <>
              <div
                onClick={(e) =>
                  e.stopPropagation() || instanceRef.current?.prev()
                }
                className="arrow arrow--left"
              >
                <svg
                  viewBox="0 0 24 24"
                >
                  <path d="M16.67 0l2.83 2.829-9.339 9.175 9.339 9.167-2.83 2.829-12.17-11.996z" />
                </svg>
              </div>
              <div
                onClick={(e) =>
                  e.stopPropagation() || instanceRef.current?.next()
                }
                className="arrow arrow--right"
              >
                <svg
                  viewBox="0 0 24 24"
                >
                  <path d="M5 3l3.057-3 11.943 12-11.943 12-3.057-3 9-9z" />
                </svg>
              </div>
            </>
          )}
        </div>
        {loaded && instanceRef.current && (
          <div className="dots">
            {[
              ...Array(instanceRef.current.track.details.slides.length).keys(),
            ].map((idx) => {
              return (
                <button
                  key={idx}
                  onClick={() => {
                    instanceRef.current?.moveToIdx(idx)
                  }}
                  className={"dot" + (currentSlide === idx ? " active" : "")}
                ></button>
              )
            })}
          </div>
        )}
      </div>
    </>
  )
};

export default ProductGrid;
How it works: This component uses state variables to keep track of when the Keen Slider library has fully created the carousel and what slide we’re on. It fills the carousel with ProductCard components generated from the products prop we were passed in. They’re responsive too — we’ve got it set to make one product visible in the carousel for every 200px of screen real estate. Once the carousel fully loads, it adds on the controls to slide the carousel around. With CSS, it looks like this:

Category options. On that Walmart page, they highlighted several categories of items (likely their best-selling) to encourage exploration. Here’s a component that can do that:
// components/CategoryCard.js

import './CategoryGrid.css';

const CategoryCard = ({category}) => {
  const id = category.match(/[a-zA-Z ]/g).join("").toLowerCase().split(" ").filter(x => !!x).join("-");
  return (
    <a
      className="category-card"
      href={`/categories/${id}`}
    >
      <img
        src={`/categories/${id}.jpg`}
        alt={category}
      />
      <h3>{category}</h3>
    </a>
  );
};

const CategoryGrid = ({ title, categories }) => {
  return (
    <>
      <h2 className="category-grid-title">{title}</h2>
      <div className="category-grid-wrapper">
        {categories.map(category => <CategoryCard key={category} category={category} />)}
      </div>
    </>

  )
};

export default CategoryGrid;
How it works: This component creates a container full of CategoryCards, each representing one of the categories we want to display. They come into this component as displayable text (like Dairy, Eggs & Plant-Based Alternatives), so we also built in a repeatable way to collapse that into an ID we can use for URLs and images (like dairy-eggs-plantbased-alternatives). With CSS, it looks like this:


Search. You knew we weren’t going to get through an Algolia article without it! This exploration-driven page is for customers willing to try new things, but search is for people who know what they want already. We need to have both if we’re going to serve our entire user base. For the sake of keeping the demo simple, we’ll just build the Autocomplete in a separate component and let it change the URL of the page, but we won’t build out the whole search results page. Here’s that autocomplete component:
import React, { createElement, Fragment, useEffect, useRef, useState, useMemo } from "react";
import { createRoot } from "react-dom/client";
import { usePagination, useSearchBox } from "react-instantsearch";
import { autocomplete } from "@algolia/autocomplete-js";
import "@algolia/autocomplete-theme-classic";
import { createLocalStorageRecentSearchesPlugin } from "@algolia/autocomplete-plugin-recent-searches";
import { createQuerySuggestionsPlugin } from "@algolia/autocomplete-plugin-query-suggestions";
const Autocomplete = ({ searchClient, className, ...autocompleteProps }) => {
const autocompleteContainer = useRef(null);
const panelRootRef = useRef(null);
const rootRef = useRef(null);
const { query, refine: setQuery } = useSearchBox();
const { refine: setPage } = usePagination();
const [instantSearchUiState, setInstantSearchUiState] = useState({ query });
useEffect(() => {
setQuery(instantSearchUiState.query);
setPage(0);
}, [instantSearchUiState]);
const plugins = useMemo(() => {
const recentSearches = createLocalStorageRecentSearchesPlugin({
key: "instantsearch",
limit: 3,
transformSource: ({ source }) => ({
...source,
onSelect({ item }) {
setInstantSearchUiState({ query: item.label });
}
})
});
return [
recentSearches,
createQuerySuggestionsPlugin({
searchClient,
indexName: process.env.ALGOLIA_QS_INDEX_NAME,
getSearchParams: () => recentSearches.data.getAlgoliaSearchParams({ hitsPerPage: 6 }),
transformSource: ({ source }) => ({
...source,
sourceId: "querySuggestionsPlugin",
onSelect: ({ item }) => setInstantSearchUiState({ query: item.query }),
getItems: params => !params.state.query ? [] : source.getItems(params),
})
})
];
}, []);
useEffect(() => {
if (!autocompleteContainer.current) {
return
}
const autocompleteInstance = autocomplete({
...autocompleteProps,
container: autocompleteContainer.current,
initialState: { query },
onReset() {
setInstantSearchUiState({ query: "" })
},
onSubmit({ state }) {
setInstantSearchUiState({ query: state.query })
},
onStateChange({ prevState, state }) {
if (prevState.query !== state.query) {
setInstantSearchUiState({
query: state.query
})
}
},
renderer: { createElement, Fragment, render: () => {} },
render({ children }, root) {
if (!panelRootRef.current || rootRef.current !== root) {
rootRef.current = root
panelRootRef.current?.unmount()
panelRootRef.current = createRoot(root)
}
panelRootRef.current.render(children)
},
plugins
});
return () => autocompleteInstance.destroy();
}, [plugins])
return
export default Autocomplete;
How it works: This component hooks into InstantSearch to merge in the Autocomplete UI Algolia has already provided for us in the @algolia/autocomplete-js package. Then it adds plugins to include recent searches and query suggestions. For more information about this setup, take a look at this guide. With CSS, it looks like this:


Get some data
Now that we have components to display the products, categories, and ads, we need to hydrate them with appropriate data. This is the fun part!
Categories
At the top of the page, we want to load in the product categories, prioritizing the ones that are most likely to appeal to this particular user. We start by defining a full list of all the categories we want to advertise on this page.
const fullCategoryList = [ // our full category list, in order of advertising preference. These are used to fill the list of 6
"Snacks & Sweets",
"Beverages",
"Pantry Staples",
"Dairy, Eggs & Plant-Based Alternatives",
"Food & Beverage Gifts",
"Frozen",
"Breads & Bakery",
"Meat & Seafood",
"Deli & Prepared Foods",
"Breakfast Foods",
"Produce",
"Fresh Flowers & Live Indoor Plants",
"Alcoholic Beverages",
"Home Brewing & Winemaking",
"Meat Substitutes"
];
These will be the only categories allowed on the browsing page, so we’ll add images for all of them to our public assets folder. Then we can ask Algolia’s Personalization API for information about this user’s “affinities”, or the categories they’re most likely to shop in.
const personalizationClient = algoliaClient.initPersonalization({ region: 'us' });
const personalizationResponse = await personalizationClient.getUserTokenProfile({ userToken: process.env.ALGOLIA_USER_TOKEN });
Then we can just modify the data a bit, getting the top-level category names and making the list exactly six categories long (with the user’s affinities first).
const categories = Object.keys(personalizationResponse.scores["hierarchicalCategories.level1"])
	.map(category => category.split(" > ")[0]) // get just top-level category name
	.filter(category => fullCategoryList.includes(category)) // make sure that these are categories we want to advertise and have images for
	.concat(fullCategoryList)
	.filter((category, index, array) => array.indexOf(category) == index) // creates a list of all categories, but with the user's affinities first
	.slice(0, 6); // get the first 6 categories from the list
Then in our JSX, we’ll just use the now-standardized categories variable to hydrate our header and grid of categories.
<Header
  categories={categories}
  indexName={indexName}
  appID={process.env.ALGOLIA_APPLICATION_ID}
  apiKey={process.env.ALGOLIA_API_KEY}
/>

<CategoryGrid
  title="Find what you need"
  categories={categories}
/>
We’re duplicating the list of categories because the header is meant to persist from page to page as a navigation bar, while the CategoryGrid component only shows up on this root page, not the pages for each category.
Recommended For You
This one is a little simpler. Assuming Algolia has enough data on this particular user, the API can predict what other products the user is likely to want to buy. We don’t even need to do much data manipulation here because it comes prepackaged for us:
const recommendClient = algoliaClient.initRecommend();
const recommendResponse = await recommendClient.getRecommendations({
  requests: [
    {
      indexName: process.env.ALGOLIA_INDEX_NAME,
      model: "recommended-for-you",
      threshold: 0,
      queryParameters: {
        attributesToRetrieve: ["*"],
        enableRules: false,
        ruleContexts: [],
        getRankingInfo: true,
        enablePersonalization: true,
        userToken: process.env.ALGOLIA_USER_TOKEN,
        facetFilters: [],
        responseFields: "*",
        analytics: false
      }
    }
  ]
});
const recommendedForYou = recommendResponse.results[0].hits;
Then in the JSX, we send it to the ProductGrid component we made earlier.
<ProductGrid
  title="Products you'll like"
  products={recommendedForYou}
/>
Great! That’s all it takes to make this super powerful AI model work for us and for our customers.
You Previously Bought
The last section is a list of items the user previously bought. You could get this from your orders database, or you could fetch it directly from a seldom-used endpoint in the Insights API and do a little filtering.
let insightsSearchParams = new URLSearchParams();
Object.entries({
  userToken: process.env.ALGOLIA_USER_TOKEN,
  orderBy: "receivedAt",
  direction: "desc",
  limit: 1000,
  "x-algolia-api-key": process.env.ALGOLIA_API_KEY,
  "x-algolia-application-id": process.env.ALGOLIA_APPLICATION_ID
}).forEach(([key, val]) => insightsSearchParams.append(key, val));
const insightsResponse = await fetch("https://insights.us.algolia.io/1/events?" + insightsSearchParams.toString());
const boughtBeforeObjectIDs = [...new Set(
  (await insightsResponse.json()).events.filter(x =>
    ['Product added to cart', 'Products purchased'].includes(x.event.eventName)
    && x.event.index == process.env.ALGOLIA_INDEX_NAME
  ).flatMap(x => x.event.objectIDs)
)];
const boughtBefore = (await algoliaClient.getObjects({
  requests: boughtBeforeObjectIDs.map(objectID => ({ objectID, indexName: process.env.ALGOLIA_INDEX_NAME }))
})).results;
This gets all the recent events we’ve sent for a particular user and filters them down to the purchase-related ones on this index specifically. Then it just gets the product data for all the object IDs we have and sends them off to the display component:
<ProductGrid
  title="You've bought before"
  products={boughtBefore}
/>
AI-driven browsing is worth the investment
Algolia calls all of these nifty API capabilities AI Browse. Setting up your category pages like this doesn’t take much time or effort, but the results can be massive. It’s one of the first low-hanging fruit features you should be adding to your site if you’re looking to boost your ecommerce revenue.
Want to make it even easier and just take my code? Sure! It’s yours 😊 The process is simple:
- Sign up for an Algolia account here
- Make an application and fill your first index with data
- Clone this repo
- Add your environment variables as the README describes
- Run
npm run dev
Also, be sure to try out the new Collections feature. Build thematic or seasonal collections pages powered by AI, no coding required. Collections pages can by dynamically optimized based on shoppers' preferences and your merchandising team's goals. If you want to see it in action, schedule a call with our team for a demo. Let us know what you build! We’d love to publicize your creation with your permission. Happy building!


